Installing full fenders

In one of my last architecture class, “Professional Practice” I think, we were given a rule of thumb for estimating the time needed to complete a task; multiple the time you think it will take by three. If you are installing full fenders on a road bike that was not designed for fenders double that (six times your first guess) and you should be close. For starters, allow at least one day for the job.

Why did I want full fenders? To tell the truth I asked myself that a number of times while trying to get these set up.

The SKS Race Blades I’ve used thus far are pretty good. They take about 15 minutes to install the first time, about 1 minute after that. They pretty much eliminate the stripe down my back. They reduce the amount of water in my shoes and road spray on my water bottles during rain and when riding on wet roads or through puddles. Basically the Race Blades helped enough to make me realize how great real fenders could be. I wanted fenders that would eliminate water from coming off my tire and dumping in my shoes and significantly reduce road spray for people riding behind me. The question is will the improvement in water and mud management outweigh the hassle of installation.

I purchased fenders from Velo Orange. I wanted the longest fenders available in a 35-37mm width, which was the limit of my brake calipers, fork and seat stays. I had the minimum clearance above my tire recommended by Velo Orange; 9-10mm. The problem is that VO’s minimum is an absolute minimum and doesn’t necessarily apply to their standard installation kit.

Let’s start with the front fender. VO ships fenders with a daruma bolt to mount the front. It (theoretically) slides up through the fork crown and over the front brake mounting bolt. After clearing the crud out of the hole in my fork crown the daruma bolt still would not fit. I ended up pulling the stem and dropping the bolt down through the steerer tube.

OK. So when the daruma bolt is properly installed on the brake mounting bolt it hangs about 13mm below the bottom of the fork crown … so much for 10mm clearance.

I cut down the daruma bolt about 5mm. So now I’m back to 8mm intruding into my 10mm clearance. But you’re still supposed to get a metal washer, thick rubber washer, fender, metal/leather washer, and nut onto that bolt. I replaced the thick rubber washer with a thin one, eliminated the other two washers and ground about 4mm off the thickness of the nut. With everything in place the nut sits flush with the end of the bolt. The nut has a greater diameter than the bolt (of course) so it effectively extends farther down. Which leaves about 1mm of clearance between my tire and the daruma bolt/nut.

With a sliding bracket and Sheldon’s fender nuts to mount the rear fender I thought it would be a breeze. The 36mm fenders are supposed to accommodate tires up to 27mm width. My tires are 25mm … should be lots of room. In actuality the sliding bracket significantly reduces the range of vertical adjustment and the available width of the fender. Unless it is perfectly centered my tire rubs on one side or another.

I expected to have a problem because I have no chainstay bridge, but the fender is very solid in that area without any attachment. I just need a piece of thick plastic tape to prevent any problems from occuring where the fender touches the front derailleur mount.

So I finally got these things on with no rubbing. I am not going to spend more time worrying about perfect fender line. I haven’t trimmed the fender stays yet. I’ll wait until I’ve accumulated some miles and am sure the length is ok. And I’m still planning to add a Planet Bike mud flap on the back. I have some worries about the tiny clearances between my tires and the nuts protruding into the under-fender space and what will happen if there if a little sand or mud on my tire. I’ll let you know how it goes.
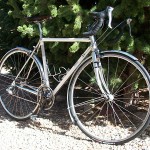
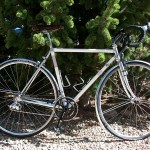
fenders-1    fenders-2

Horsetooth – Stove Prairie 200k

Saturday I rode Rocky Mountain Cycling Club’s Stove Prairie 200k Brevet. I guess I’m going to have to stop using superlatives like “one of the best routes I’ve ridden” because there are just so many beautiful rides to do. Stove Prairie is one! And with the exception of a few minutes riding next to Horsetooth Reservoir, the weather was excellent.

I have to admit that with “prairie” in the ride name I wasn’t expecting much scenery and I wasn’t expecting much climbing. I was wrong on both. Almost as soon as we left Berthoud the route went past beautiful farms, gentle hills, and rivers that were only a teaser for what was to come.

We worked our way up and down and around Horsetooth Reservoir with a few nice, short, steeper climbs. Towards the end of the reservoir loop we encountered wind gusts from random directions. Fortunately the wind wasn’t too strong; the strongest gusts probably low 20’s mph, so it was just a matter of relaxing, slowing down to a comfortable speed, and staying far enough from the edge of the road to avoid being blown off by a gust from the left. The random wind ended after we rolled down from the reservoir and soon we were at CP2, Vern’s Store in LaPorte.

From there the route takes a long, gradual climb up Poudre Canyon. The river and the canyon are beautiful; definitely worth a bike ride or car trip! The pine forest here still seems healthy compared to the forest near my house and other parts of Colorado.

You could consider the climb up Poudre Canyon a warm-up for the real climbing, from Mishiwaka to Stove Prairie. It’s about 5 miles from the intersection of Highway 14 and Road 27 to Stove Prairie. Because I was a little tired from hanging onto John Ellis’ wheel coming up Poudre Canyon and because I wasn’t sure how long or hard the climb would be, I held back a little and enjoyed the scenery. There’s a stream running beside the road and the forest is pretty close on both sides most of the way up. The climb reminded me of the south side of Cuchara Pass from North Lake; several steep pitches interspersed with flatter sections and even a down hill section before the last mile to the top.

From the top of Stove Prairie the miles went by pretty quickly … especially the first 23 miles to CP4. There were several steep descents on the downhill side of Stove Prairie and more beautiful scenery. After CP4 the route was flatter, though still downhill overall. We rode past lots of horses enjoying green pastures on the way back to Berthoud and soon after we were finished.

Wish I’d gotten some photos to post, but you’ll just have to go see it for yourself!

If you’ve want to give randonneuring a try Rocky Mountain Cycling Club is a great place to start. They schedule many brevets (200-1200k) and populaires (around 100k). Their rides are usually very well attended with lots of experienced, friendly riders willing to answer newbie questions.

“Brevet” is French for cold, windy bike ride

I wish I could take credit for the title of this post, but I’m just repeating the words of another of the six Malpais 300k riders last Saturday. I’m infrequently that original, and would in any case, add “wet” to cold and windy, since that has as often as not, been my experience.

It was a perfect day in New Mexico; sunny and dry, with few clouds in the sky and a high of 63 degrees. A perfect day that is, if you watched from your window and never stepped outside. The NOAA three day, hourly history for Saturday between 6am-8pm, reports that winds in the area averaged 20-29mph, with gusts from 26-40mph. Mercifully, if anything can be merciful about fighting the wind for 12 hours, it was blowing from one direction. (In fact, I’m starting to wonder if I live in one of the few places in the world where the wind commonly blasts your right side, only to blast your left the next second.)

As usual, with the exception of the uncontrollable weather, it’s difficult to fault an NM Brevet. It is probably getting boring to read how fabulous the ride coordinators and volunteers are, but they are. Exceptional!! As is the Malpais Route! About 193 miles of the 195 miles were on rural roads. There were many stretches where fewer than one vehicle per mile passed. I would rank it among the most beautiful rides I’ve done. If one is fond of the desert southwest it’s worth a trip to do this ride.

Regardless of the wind, I wasn’t having a superb day on the bike, but I managed to make my way to the finish before dark. I was certainly glad for the short ride to my hotel room (there are several hotels within 1/4 mile of the start/finish), a warm shower and bed.