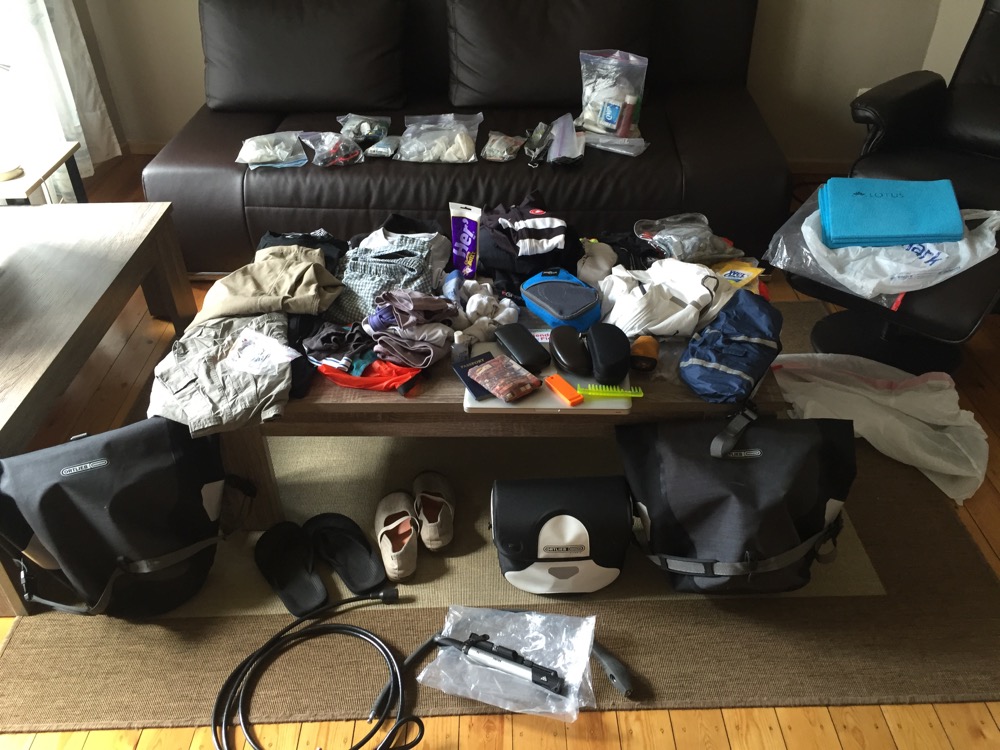
Skip to content

Pizza!

2011 October 31
tags: ,
by cathy

Vegan Month of Food Logo

For the last day of Vegan Month of Food: Pizza! Pizza is one of my favorite foods. Probably because when I was a kid, my family nearly always celebrated with pizza. In spite of my love of bread, I like thin crust pizza best. This recipe will make a crust as thin as you can roll it. The problem is getting it to stay rolled out. I usually roll it on parchment paper, which the dough sticks to a bit. Then move the parchment paper with pizza atop directly to the pizza stone.

Pizza with pesto and tofu

Pesto and tofu pizza

I use a crust recipe similar to these two from pizzamaking.com: Pizza Inn Style “Original Thin” and Thin Cracker-Crust. Those pizza makers are much more exacting than I, so you may want to refer to their instructions. I’m just happy to have a crispy, non-sagging, thin crust.

Yield: 8-9 servings

  • 1-1/2 tsp. yeast
  • 3/4 c. + 1 tbsp. warm water
  • 1-2 tsp. sugar
  • 3-1/2 c. high gluten flour
  • 1-2 tsp. olive oil
  • 1 tsp. salt

First put the yeast, warm water and sugar into the mixer. Stir briefly. Then let it sit for a 5 minutes to proof your yeast. As soon as you start to see tiny bubbles, or foam, you’ll know the yeast is good. I am often tempted to skip this step, and I was glad I didn’t this time because the first yeast I tried was dead.

Add olive oil and mix. Then add flour and knead with mixer for 10 minutes or so. You might have to knead longer if you’re doing it by hand. Last add the salt and knead for another minute or two to get it mixed well. Transfer dough to a covered container. Let rise on the counter 1-4 hours. Then move to the refrigerator overnight. I’ve kept it in the refrigerator for up to 48 hours before using.

When you’re ready to make pizza, place pizza stone on a middle shelf in your oven and preheat to 425°F. Place a piece parchment paper on the counter. Pinch off dough the size of a small fist for each serving. (Note: 3-4 small fists worth is probably max for most pizza stones.) Form a ball with the dough and place in the middle of the parchment paper. Unless, you’re an expert pizza dough thrower, use a rolling pin to roll out the dough. I try to get it 1/8″ (3mm) or less. Add toppings. Bake for 10-12 minutes.

If I’m not planning to eat pizza again within a day or two, I separate the extra dough into serving size balls and freeze. Take as many as you need out of the freezer the day before you need them, and let them thaw in the refrigerator.

Vegan bowls

2011 October 30
tags: ,
by cathy

Vegan Month of Food Logo

Along with a lot of great recipes, Appetite for Reduction by Isa Chandra Moskowitz has a great discussion about, and ideas for putting together a vegan bowl. This was my first attempt:

  • Buckwheat noodles
  • Steamed Cauliflower
  • Steamed Broccoli
  • Shelled Edamame
  • Red beans
  • Sesame oil
  • Balsamic vinegar
  • Soy sauce

Vegan Bowl

Homemade energy bars

2011 October 29
by cathy

Vegan Month of Food Logo

I’ve experimented with several different kinds of homemade energy bar recipes, but these are the only ones worthy of offering to others. They’re basically a mix of cereal/fruit/nut stuck together with nut butter and rice syrup. I started with this recipe from The Vegan Delicious blog. You might be able to skip the baking step, but it helps the bars hold together.

  • 1/2 c. almond butter
  • 1/2 c. rice syrup
  • 1/2 c. Perky’s Nutty Flax Cereal
  • 1/2 c. puffed millet
  • 1/3 c. toasted pecans
  • 1/3 c. dried blueberries
  • 1/4 c. dried cherries
  • 1/3 c. raisins
  • 1/3 c. chopped dates
  • 1/3 c. chocolate chips

Preheat oven to 350°F. Grease 9×13 or 8×8 baking pan with coconut oil. Pan size doesn’t really matter. You’ll have thicker bars with a smaller pan. Mix almond butter and rice syrup. Add cereal and coat well. Add remaining ingredients and mix well. Use a metal spatula to press mixture into pan. Bake for 5-10 min. Remove from oven and use spatula to further compress bars. Press the mixture into the pan well. Otherwise you’ll have crumbles instead of bars. Allow to cool and cut.

Homemade Energy Bar

Friday night entertainment

2011 October 28
tags:
by cathy

Vegan Month of Food Logo

If you haven’t seen Forks Over Knifes, stream it tonight. It’s available so watch instantly on Netflix.

Pan-fried plantain

2011 October 27
tags: ,
by cathy

Vegan Month of Food Logo

This recipe was based on Madhur Jaffrey’s, “Sautéed Yellow Plantain” from World Vegetarian. I used less oil than called for in her recipe.

  • One plantain, yellow with black spots
  • 1/2-1 tsp olive oil
  • salt
  • black pepper

Heat oil in pan over medium flame. Peel plantain. After cutting off the stem, it peeled pretty much like a banana. Cut into thirds lengthwise, then into 2-3″ long pieces. Add plantain to pan with oil. Cook 8-12 minutes, turning to get all sides browned. Add salt and pepper to taste.

These reminded me of lemony, pan-fried potatoes with a slight banana flavor.

Sweet potato biscuits

2011 October 26
tags: ,
by cathy

Vegan Month of Food Logo

Sweet potato biscuits from Isa Chandra Moskowitz’, Appetite for Reduction. A good breakfast drizzled with a little maple syrup.

I microwave-baked the potato in a microwave potato baking bag my mom gave me years ago. It works pretty well. Potatoes don’t dry out as much when nuked in the bag.

Sauerkraut

2011 October 25
by cathy

Vegan Month of Food Logo

I don’t know if it’s just the salt or something else, but often after 8 or more hours on the bike I crave Bubbie’s Sauerkraut.

Bubbies Sauerkraut and Dill Pickle Relish

Randonneur rice bars

2011 October 24
by cathy

Vegan Month of Food Logo

Today a recipe for my infamous vegan rice bars. It’s based on Allen Lim’s rice cakes. I often take 1-3 of these on brevets. It’s nice to have a break from packaged energy bars and Twizzlers.

Moist Vegan Rice Bars

  • 1 c. sushi rice
  • 3 c. water
  • 1 Dr. McDougall’s “Chicken” Flavor Ramen
  • 1 packet Miso Cup
  • 1/2 pkg extra firm tofu, crumbled
  • 1-2 tsp Braggs Liquid Aminos
  • 1 tsp dulse flakes

I make this in a pressure cooker, as I’ve mentioned before, cook rice in your pressure cooker at your own risk.

Basically put all ingredients in the pan and stir well. Bring up the pressure. Cook for 12 min at 9000 ft, (probably 9 min at 5,000 ft, or 6 min at sea level). Turn off heat. Let pressure naturally release. When you open up the cooker the rice mixture will be pretty well compressed. Once it’s cooled, it can be cut into bars. Then the bars can be wrapped in foil. I don’t bother with forming the mixture into a rectangular pan. I’ve been able to get firmer bars by cooking everything together and not disturbing the mixture after the cooking is done. I just make a square in the middle, and usually cut 8 bars from that. Then piece together the halved, rounded edges to make 4 more bars.

You can experiment with the amount of water to make firmer, less moist bars. 3 cups makes a very moist bar, that still keeps it’s shape pretty well when cool. The ramen, miso and even tofu are absorbing some of the water, along with the rice. If you cook the rice first and then add ingredients and compress, similar to the way the Lim video shows, you’ll probably want 1 c. sushi rice to 1-1/2 c. water.

Also, some people may want more salt when they’re riding. If so you could add 1 tsp salt to the ingredients. You can also try other flavors and ingredients. Lim uses cheese in his. I’ve tried using Daiya in my rice bars and haven’t been very happy with that flavor during rides.

This video best shows Allen Lim’s foil wrapping technique, unfortunately he’s making ham, cream cheese, and jelly croissant sandwiches.

I’m not sure about other uses for rice bars. They are pretty tasty. They might make a good school or work lunch or after workout snack.

Cowgirl beans

2011 October 23
tags: ,
by cathy

Vegan Month of Food Logo
These beans reminded me of beans sometimes seen on menus as “cowboy” beans. They’re almost never vegan (though they should be), because someone thought they needed a little bacon (blech!), or pork (blech!) or chicken broth (blech!).

After cooking pinto beans in the pressure cooker, I simmered them for a couple hours over very low heat with veggie bouillon, beer, cumin, chili powder and a dried chipotle. Perfect, slightly sweet, slightly spicy pinto beans!

Cowgirl Beans

  • 3 c. Cooked pinto beans with 2-3 c. cooking water
  • 1 veggie bouillon cube
  • 1/2 – 1 c. beer
  • 1 tsp. cumin
  • 1-2 tsp chili powder
  • 1 dried chipotle pepper

Green rice and stuffed chiles

2011 October 20
tags: ,
by cathy

Vegan Month of Food Logo

Yesterday I made a vegan version of one of my favorite recipes from Madhur Jaffrey’s World Vegetarian, “Rosario Guillermo’s Green Rice with Stuffed Poblano Chiles (Arroz Verde con Chiles Relleños)”. I used a pressure cooker. I’m sure cooking rice with soy milk in your pressure cooker will void your warranty and send you to hell, so if you’re worried about either of those things you should probably cook this conventionally.

Here are the ingredients. (Tofu is not in the original recipe.)

  • 2 c. parsley leaves, loosely packed
  • 1/2 medium onion (chopped as required by your blender)
  • 3 garlic cloves (chopped as required by your blender)
  • 1/3 c. water
  • 4 roasted poblano chiles
  • 2 oz. vegan cheese
  • 3 oz. extra firm tofu, crumbled (optional)
  • 1 tsp olive oil (recipe calls for 3 Tbsp. canola or peanut oil)
  • 2 c. long grain rice
  • 1-1/2 tsp. salt
  • 3 c. soy/almond/rice milk

The hardest part of this recipe is prepping the chiles and parsley. I usually buy chiles already roasted from the farmer’s market, but shopping for ingredients at 8pm on a Sunday night limited my choices. I was lucky to find poblanos at all, but it’s that time of year!

The night before, while the chiles were roasting under the broiler, I worked at cleaning and de-stemming the parsley. I did a thorough job of cleaning (the parsley I bought was very muddy) and a less thorough job of de-stemming. Peeling the chiles isn’t too hard after they’re roasted. Depending on your sensitivity to capsaicin you may want to wear gloves for that job. I didn’t bother.

The next day, I put a little oil in the pressure cooker and started heating that over medium heat. Then put the parsley, onion, garlic and water in the blender and pulverized it. I added the rice to the oil and toasted it for 5-10 minutes. (If you think you see short grain rice in there, you do. I forgot to check my rice supply before shopping and had to use 1 c. long grain brown rice + 1 c. sushi rice.) While the rice was browning, I crumbled the tofu and mixed with Daiya shreds. Cheddar would probably be a better choice, but mozzarella is what I had, and the color matches the tofu.

Stirring the rice occasionally so that it browned, rather than blackened, I “stuffed” the chiles with the tofu and cheese mixture. “Stuffing” basically amounts to laying the chile flat, inside up, putting some cheese on it and folding it over … if you’re lucky. In my case, I put some cheese on a piece of chile and then reassembled the remaining pieces into a chile-like shape.

Once your rice is browned you should turn down (or turn off) the heat under the rice pan and let it cool a little. Otherwise, you’ll have green stuff splattered all over your stove like I did. The next step is to pour the parsley mixture into the rice. You could cook for 4-5 minutes. Since I was using the pressure cooker I just let it warm up, then added 1-1/2 c. of soy milk. I should have added all 3 cups, or 1-1/2 c. soy milk + 1-1/2 c. water. I was worried that there was already too much liquid so I cut it down.

Then I brought the pressure up and cooked it over low heat for about 15 min. (At sea level, if you were cooking without a pressure cooker you’d probably want to cook the rice for about 25 min.) After the pressure naturally released, I opened the cooker to find that the rice was a little dry. I added some water, a bit too much as it turned out, and placed the chiles on top. Then brought the pressure up, turned the heat off and let the pressure come down naturally again.

Besides the rice being a little overcooked, this was pretty tasty. Some of the rice on the bottom of the pan will probably be brown no matter what cooking method you choose. The rice is surprisingly rich, with 1-1/2 to 2 c. of soy milk. I don’t think it’s a bad idea to cut the soy milk with half water from the start.

[Sorry about the poor photos. I took them with a video camera.]